The B.B. in the title represents that this is from the archive of the late Bill Bently, who ran a flathead Q&A informational site before he passed away. All threads from this source will be titled using the B.B. identifier on this site. We’re archiving some of the threads, so that his work is not lost or forgotten and so they will continue to educate flathead enthusiasts for years to come.
20 Jun 2000
Subject: Re: Differential
I need to get my differential assembly out. The repair manual
shows a “housing spreader” tool. That’s not something I can find at
a yard sale. Is it possible to pull the assembly out without that tool?
Is the rear end something that an amateur should stay away from?
Dave
F1 differentials
Dave didn’t give any details but;
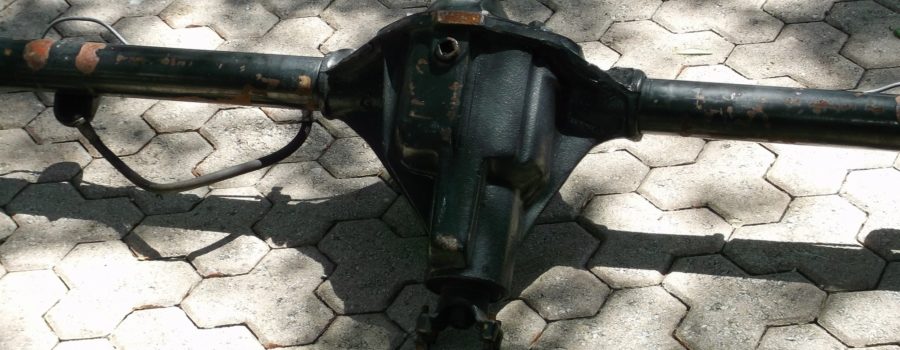
We’re talking about a Dana/Salisbury/Borg Warner, Spicer, Integral Housing design diff here with the inspection cover plate, [used in 48-56 pickups & in Station Wagons & Mercury & Lincoln from 49-56], which requires a housing spreader……unless you know another way……and there usually is.
If you are just replacing damaged spider and or axle gears or removing a broken axle end then you dont need to know about or get involved in the technicalities.
The key to carrier bearing preload & more importantly correct backlash, is controlled by one shim/spacer between carrier & bearing cup on each side….. …mix these up or break them & you’re in trouble.
You must mark the bearing caps, if not already identified & the spacers & the bearing cups as they are removed. Keep them separated. Apply corresponding marks on the housing in case you get confused about L or R
Ford orientation marks on cap & housing should be the number 4, one pair will be stamped sideways which should be the left side.
A good method for marking bearing cups & hard steel without damage is to hook up a small jumper lead from a battery & scratch arc your ID marks eliminating the possibility of a mix up….Murphy’s always right behind you!.
Use pry bars to carefully lever the carrier out of the housing taking extra care with the spacers. I never struck one that didn’t come out this way. Oh, it does help if the axles are removed first!.. :).
The ring gear [crown wheel] Must go back in the exact place it came from so you need to mark it & the carrier too.
There’s always a LOT of metal fragments hidden in pockets of the housing when differential gears break up so get the inside as clean as you can before assembly. If you don’t have pressure cleaning equipment, cleaning & removing metallic particles glued in by old gear oil can take almost as long as the job itself!. The damn stuff ends up in the axle housing tubes too!.
Note; Its best Not to get too carried away with the cleaning unless the pinion assy is removed, [now that’s NOT a job for the amateur]. If you’re sloshing solvent around with particles in tow, they could end up in the pinion bearings. So keep the pinion flange UP whilst cleaning. Sometimes its ok to just wipe away what you can with a cloth & let sleeping dogs lie…if particles are embedded then they aren’t going anywhere… but I don’t like doing that. I like the idea of a magnet strategically placed in diff housings as well as magnetic drain plugs.
When you’ve replaced the spiders, done all the cleaning, lubed the bearings & cups ready for assembly, wished you could have just bought another good diff, place the assy in position & assist with a rubber or plastic mallet.
This is a good time to count your finger tips as you’ll need to be careful to keep them attached to the first joint, there’s a guillotine each side of the carrier housing which was carefully designed!. A couple of decent sized Phillips screw drivers, or what have you, inserted into the carrier ends is a wise precaution.
Wind down the bearing cap bolt’s evenly & torque to specs. If you don’t have a manual then get one!.
Here are 48-51 F1 torque specs: ring gear to carrier bolts, size NC 3/8″ torque 30-40 ft lbs bearing cap to housing bolts NC 1/2″ 60-70
General interest;
Those who have an 8″, 9″ or 9&3/8″ diff have to “time” them. Yes, many
HYPOID ring & pinions have timing marks, usually an electric arc scratch as
described. One scratch or mark will be on one tooth of the pinion & a
corresponding mark between two teeth of the ring.
Kiwi Brian
Was this article a help? Consider supporting the Flat-Spot by becoming a Premium Member. Members get discounts with well known retailers, a cool membership packet full of goodies and your membership goes toward helping us upkeep and expand on this great archive.
