The B.B. in the title represents that this is from the archive of the late Bill Bently, who ran a flathead Q&A informational site before he passed away. All threads from this source will be titled using the B.B. identifier on this site. We’re archiving some of the threads, so that his work is not lost or forgotten and so they will continue to educate flathead enthusiasts for years to come.
FLATHEAD PORTING EXERCISE by Mike Bishop
Episode Two . . .
Before we launch into the stuff everyone’s expecting we have to
cover some ground that few early how-to authors covered . . .
EXHAUST OUTLETS
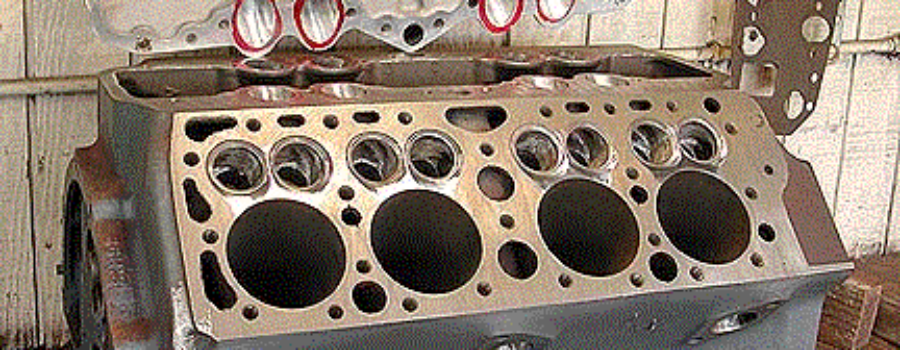
For a complete flathead porting job, the center outlets for the siamesed ports should be enlarged and the outlets for the end ports enlarged and re-contoured. Enlarging the center ports doesn’t involve much more than enlarging the opening 1/16-1/8 inch all around and blending the machined area that was milled into the block when it was manufactured. The tall rectangular passage between the center cylinders is actually rather generous because while the inside exhaust ports share it, they don’t share it at the same time.
Exhaust gases flowing out of the end ports, however, run smack into a flat wall in each corner of the block before turning 90 degrees, first one way and then another, to get out of the block and into the exhaust manifold or header. The path in the block can be greatly improved by shaping the passage at the outlet into a gentle curve back up into the exhaust tract. This is done by grinding away the abrupt shoulder inside the outlet, closest to the corner of the block, and shaping it into a smooth, progressive outlet port leading to the header tube. Here, too, the outlet should be opened up 1/16-1/8 inch all around.
Unlike the intake ports and manifold, where the runners are matched from one piece to the other, it’s preferable to have the outlet from the block a little smaller than the inlet to the exhaust manifold or header. This “mismatch” creates an anti-reversion dam that inhibits the exhaust gas from trying to sneak back into the cylinder when the intake valve begins to open as the exhaust valve is just closing.
Carbide steel burrs work better than stones for the initial work in the exhaust outlets because they remove a lot of material quickly. Also, the work in this area doesn’t require the finessing that the intake ports and bowls do. For the initial cut, to grind away the shoulder inside the port, my favorite is a short-shank 1/2-inch burr with a rounded end.
It takes only a few minutes to get the big obstruction out of the way, and then change to an oval- or flame-shape burr with a 4-inch shank to blend the outlet back up into the exhaust tract. Because of its shape, this burr will cut behind the maximum diameter of the cutting surface as well as in front of it, allow you to blend the outlet in both directions. It’s like being able to get inside the port and work back toward the opening.
Then, refine the surfaces of the outlets with a stone dressed into an oval or flame-shape, and finally put some shine on the outlets with either 100-grit cartridge rolls or 100-grit cloth in a flapper stick.


. . . when the outlet is opened up. This one gets some extra smoothing as well.
Finally, for this installment, here’s something that I should have covered in the beginning — your health.
None of the work described here should be done without the protection of a respirator — not even once, and if this is going to be your very onliest flatmotor port and relieve project ever. This one job won’t irreparably harm you, probably not, but you’re going to have your snout closer to grinding dust and particles than probably any task you’ve done before. And while your body will eventually slough off the residue, you’re miles ahead by not letting into you lungs in the first place.
(Image was LOST)
A quality respirator like this will set you back less than thirty bucks. Its value is incalcuable in terms of your health.
This is it, boys and girls — intake porting and port matching
and top-end exhaust port work, plus a little work in the bowls
beneath the valves.
In addition to an electric and an air-powered die grinder with
a 1/4-inch collet, some quality ruby aluminum-oxide stones and
a dressing stick, you’ll need that respirator and eye protection,
plus layout dye, a sharp scribe, and a quality intake gasket,
like a FELPRO — either new or one that has been salvaged intact
from a recently running motor, or better yet from the motor you
are working on.
You can put your carbide burrs back in their tubes unless you have the experience and confidence using them to safely rough-cut some of the work at the top of the bowls. An aggressive burr can get away from you before you realize it and cause real mischief. Personally, I use my fatigue level as a guide for using burrs. After 4-5 hours of steady porting and block work I’m inclined to do tasks that require stones and leave the burrs parked until the next day when I’m rested. There aren’t many do-overs in this work that don’t involve some expensive repairs. If you’re uncertain, stay with the stones for the work up top.
This is probably a good time to point out that this isn’t a six-pack job — unless it’s a six-pack of caffeinated soda.
An accurate gasket makes a handy template for scribing the outline of the ports on the manifold deck and on the underside of the intake manifold so that when both are opened up to the scribe lines there will be a continuous flow path from manifold to block, with no sharp “steps” to inhibit flow. Just make certain the gasket is for standard ports and not for large, high-performance ports.
The initial work opens the port up to the scribe line, removes any knobs, warts, and casting or rust texture, and enlarges it ever so slightly at the roof where it enters the bowl — on the short radius. Not only is there nothing to be gained by enlarging the bottom of the port — the long radius — but flowbench tests have shown that this actually degrades flow in a Ford/Mercury flathead.
One of the most productive things to do to improve intake port flow is blending the roof of the port, the short radius, where it enters the bowl. Reach into an unmodified intake port from the bowl and you can feel the abrupt edge, at the bottom of the valve seat, that’s a definite flow inhibitor. Knock this down a little with the 1/2-inch stone and blend it into a smooth curve from the intake port to the valve seat and you’ve done a significant wakeup of intake flow.
So, let’s see what all this work looks like .


Finally, some real visible progress . . .


We’re getting close to the end, doing a street relief, port matching the manifold, and sanitizing the block inside and out.


The obvious question is: How much of an increase does all this work yield? The short answer is: It just depends.
On an otherwise box-stock flat motor it might be worth 2-5 horsepower, depending on how good or bad the original casting and machine work was.
The real value in this work is in the potential it provides — what it permits other modifications to do, such changes as higher compression, camshaft and valve train improvements, increased fuel delivery, and improved ignition. It’s not unreasonable to attribute 12-15 horsepower to the port work on a fully modified motor.
At the very least, it can’t hurt so long as it’s done sensibly. And it is a helluva lot of satisfying fun if you’re even just the slightest bit fussy about your hardware. I have another one to do next week and I’m jazzed just thinking about it! And it’s not even mine!
av8
The roof of the runner is potentially a bit tricky, and I won’t use anything other than a stone, worked in constantly moving in-and-out strokes with a slight circular pattern. It’s a bit like rubbing your stomach while patting your head, but once you develop the motion it works very well with zero risk of finding water, and it yields some wonderful shapes on the short radius.
Carl . . .
Based on what Bing has shown me, I wouldn’t take any more off the deck in the transfer area than I had to. I would take some material out of the head to soften the compression and gain some transfer flow potential.
av8
Got a PM last night from someone porting his block per my instructions, and he pointed out a problem that he had at the beginning involving tool control with an air die grinder.
I find it helpful to have a small pressure regulator valve on the grinder to control tool speed and keep it constant. This permits me to maintain a firm grip on the grinder, with the trigger all the way down. Also, I position my forward hand as close to the working end of the tool as possible and use my thumb or a finger for a steady-bridge against the block.
To avoid awshit breakthroughs in the roof I don’t use a burr from the deck side of the runner, only on the bowl side. Here I do the initial cut on the bottom of the valve guide area with a little blending down onto the bowl sides to remove the “cheeks” where the runner and bowl meet.
Since I’ve been using the CHA (Cylinder Head Abrasives) stones I have been able to do the roof and short radius very quickly without danger of hitting water. The 1/2-inch aluminum oxide, dressed with an egg shape, is quick, thorough, and safe.
In response to an earlier question you had, during my mentoring I was taught that there was little or no benefit in dropping the floor of the runner, and in fact Ed Binggeli learned long ago, doing flow testing, that it can actually degrade flow. Opening up the sides of the transition of the runner to the bowl appears to help equalize the area of the runner.
BTW, I neglected to provide contact info for the good stones:
CYLINDER HEAD ABRASIVES
3322 Luyung Drive
Rancho Cordova, CA 95742
1-800-456-5474
1-916-638-1212 Local calls
1-916-638-0510 FAX
The stones run from $2.00 for 1/2-inch, 4-1/2-inch shank, to $2.60 for 3/4-inch, 6-inch shank. FWIW, the 4-1/2-inch shank is really long enough to reach any place you need to in a flat motor; I usually end up cutting 6-inchers down — to about 4-1/2 inches!
When you order, ask them for a catalog. They have pieces I’ve found nowhere else. Just as important as the range of their porting tools and supplies, the quality of their stones is excellent, easily the best I’ve used.
Flatdog . . .
Thanks for the explanation on the use of the “tool.” I can see the application now, for blending the grinding work and getting rid of ridges.
The high-quality ruby aluminum-oxide stones, with long shanks, available today sure make the transition work from one end of the port to the other a lot easier than it was in the way back. I use a combination of side-to-side, back-and-forth, and circular movements of the stone in the port to develop a shape and a uniform surface. The final circular movement, which I learned from Kent Fuller, levels bumps, ridges, and troughs as if by magic! Fuller learned this from Don Clark at C&T Engineering in the early ’50s, when Fuller was a young guy.
I want to add a recommendation I missed earlier, and that is buy SA (Standard Abrasives) products when offered a choice. Swap-meet offshore rolls and cloths and flap wheels are no bargain at all. Bargain sanding rolls blow up almost immediately while SA rolls just keep on working, no matter how hard you lean on ’em. Best of all, SA straight cartridge rolls wear into very good tapered rolls with use, and provide you with some really neat capability for finessing shapes and polished surfaces. The bargain stuff never gets this far.
Who’d have thought?
Mike Bishop
Was this article a help? Consider supporting the Flat-Spot by becoming a Premium Member. Members get discounts with well known retailers, a cool membership packet full of goodies and your membership goes toward helping us upkeep and expand on this great archive.
