Author: Dale “Bored and Stroked” Hays, Vintage Horsepower, daleohays@gmail.com
I’ve been telling myself that I’m going to create “yet another” flathead
porting and relieving post. One has to wonder why I’d even waste/take
the time . . . given the wealth of knowledge, posts and opinions
available. I guess the only reason is that when I first got into
flatheads (35 years ago), I read EVERYTHING I could, bought every old
DIY mag, studied everything, talked to all the old racers . . . in the
end, it is like going to the Fortune Teller — she tells you all sorts
of crap, it is up to you to decide what to take away. I’m not going to
claim to have the definitive answer to anything flathead related —
there are more opinions that A$$holes . . . so if this is valuable,
cool . . . hope it helps somebody.
1) Multi-Part Series: I’m going to start this thread, continue to add
to it over the next few months and hopefully finish it in early 2010.
====================================================
Background: I’ve read just about every dang article out there,
seen all the pictures, read all the articles and hung out with some
people who have really made flatheads run — and learned a LOT along the
way. There are MANY ways to port/relieve a flathead — you need to
decide the type of engine you’re building, understand your capabilities
(with an air grinder) and use your own common sense. The type of
port/relief job you do for a very hot street engine is very different
than one that is going to Bonneville. In some cases, the type of
port/relief jobs I’m going to show would actually make your car run
worse (from a stop sign) – especially if it is a heavy car, didn’t
have the rest of the engine combination (cubic inches), etc.. There
is no ‘standard port/relief’ job that works for everybody . . . it all
depends on what you’re trying to accomplish, what the rest of the engine
is setup to do, your expectations, etc..
Just to let you know, I typically build pretty hot engines . . .
bored/stroked, big cams, with light cars, race gears, etc — the type
you’d race back in the day. So — if you’re just looking for a nice
polish and port-match article — this is not it!
Installment #1: Understanding the flathead intake port It is
really hard to understand/imagine just how much you have to work with —
unless you’ve ported a bunch of these . . . ‘hit water’ once or more,
etc.. When I was doing my first heavy port jobs, all I could think
about was “I wonder if I’m going to go through and hit water???”.
Honestly — it was a lot of trial and error, asshole puckering and being
just plain scared about half the time I was working. I only wish I
knew what the port actually looked like – to see just how much I had to
work with.
Here is a cutaway of a 40’s era 59L type block — showing what the stock
port looks like, with dimensions to show what you have to work with.
The dimensions on the side walls show you how thick the ports are on the
sides — while the cut-away dimensions show the top, bottom, back of
valve pocket, etc.. Take some time to really study this picture — it
is the bible you should live by.

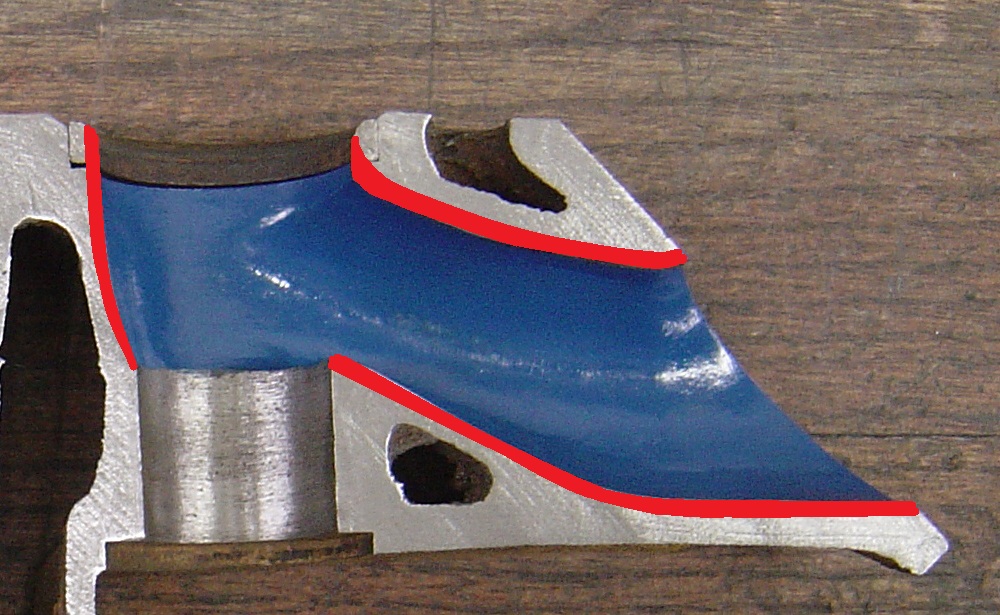
The next picture is one that I’ve reworked to show you the basic areas that you need to concentrate on – for a race type intake port job. Yes, there are many variations, but this will give you the basic idea as to where you need to rework the port, how you’re really trying to rework the short-side flow, etc.. There is not a huge amount to be gained in the bottom of the port – it is the top (short side) that stands to gain the most. Notice that you need to be very careful about how much material you remove in the bottom — there have been plenty of first-time porters who tried to “remove the hump/raised” area . . . only to hit water (it is only .160 thick at best!).
What this picture can’t show is that you’ll widen the port as well – taking material out of both sides (starting on the intake manifold end and going the length of the port). Quite a bit of work needs to be done to open up the port and blend it into the bowl area, blend it into the opened up short-side (roof), etc.. You’ll need some long carbide cutters, stones and sand-paper rolls to reach to the area from the manifold side all the way to the bowl area.
Installment #2 – Sample Work: I’ll now show an example of a fairly heavy port/relief job for a full race street engine.
1) Application #1 – Street “Full Race” Setup
This term was widely used back in the day – what the hell it exactly means??? . . . who the hell knows. I’ve categorized it as such in that there was a heavy amount of work put into this block — roughly 40 or so hours of porting and relieving. The engine belongs to ‘RustyBucket’ (Chris Daniels) – it is his first flathead and his first port/relief job. We discussed the overall engine package, application, goals, etc — so I could help him determine a path to go on. I roughed the first port – so he could see about how far to go then said “you get the next 15”. One never appreciates the work that a really nice port/relief job requires . . . until you do one yourself! Chris has done an EXCELLENT job . . . check it out . . .
Engine Specifications:
Engine: 42-48 59AB style block.
Bore: 3 5/16
Stroke: 4″ Merc crank
Cubic Inches: 276
Rods: 49-53 Frenchies
Heads: New Edelbrock block letters — didn’t measure the CCs, but they are fully machined in the valve pocket area (about .500 deep) – this reduces compression (which came into play on our relief decision).
Intake: Edelbrock Slingshot (new) – dual Stromberg 97’s
Cam: Potvin 3/8 (great cam . . . thanks ‘Pete1’)
Valves: Stainless Pro-Flow style – 1.5″ on both
Ignition: Harman-Collins dual coil
Headers: Belond style – ‘Reds’
Flywheel: Lightened to 25 or so lbs (can’t remember the exact #)
Clutch: 9″
Application: 28 Model A roadster on 32 rails, 39 trans, Halibrand Q.C.
Things to Think About: This is a light car, has a quick change, has a medium weight flywheel, has a 39 transmission. He is running bias ply tires – don’t remember the diameter, but they are very tall in the back (probably 32″ or so). This car can take a pretty big cam, some fairly heavy porting and still have enough torque to come away from a stop sign really nicely. It may be a bit under carbed – we’ll find out, but it can take a pretty big port/relief job and still have enough low-end power. I doubt he’ll rev it much past 5500, so total top-end transfer area flow is not a big issue — it is more important to maintain compression ratio. Also, at 276 cubes – it can take a fairly large port and maintain decent low-speed port velocity.
Relief: Semi Relieved – Nice Blending into the Transfer Area:
Pay attention to the relief style – it is much more of a blend and radius method, than the traditional 1/8″ to 3/16″ full relief. This was done to preserve compression and still help flow. The edge of the bore was radiused a bit as well.
Rough Porting and Rough Relief:


Ports In-Progress and Finished:
Relief Finished – With Bore Edge Radius:

Installment #3: Competition Port/Relief
The next engine is a 59L block that originated in a Kenz & Leslie
streamliner (at least that was the story when my Uncle bought it in
Denver and gave it to me as a Xmas present for my 16th birthday). It
was already pretty heavily ported (about like the other example) – and
had a full traditional relief.
I then put a lot more work into all the ports, the relief, the exhaust
passages, etc.. Basically, I reworked everything I could get a
long-reach piece of carbide, stones and sandpaper into.
I ran this in with a SCoT blower about 30 years ago, then “mothballed” it until last year or so.
What I show you is ALMOST complete for it’s next update — the ports are
done, the relief is done, but I have yet to install the large intake
valves (probably 1.65 to 1.7).
Engine Specifications:
Engine: 42-48 59L Block
Bore: 3 5/16 + .020
Crank: Merc crank – 4 1/8″ stroke – fully polished, grooved mains, clearance ground
Cubes: 286
Heads: Either Navarro High-Dome or Baron Pop-Ups
Rods: H-beam – reworked to lighten them
Main Girdle and Steel Caps: Doug King
Cam: .450 or so lift and about 270 degrees at .050 lift (big!)
Blower: GMC 4-71
Fuel System: 650 HP – double pumper or 2-port Hilborn
Valves: Titanium intake – 1.7″, Severe-duty 1.5″ exhaust
Guides: 49-53 – sleeved back to .3125 – bronze liners
Oiling: Aviad pan, scrapers, trap doors, 10 qts
Oil Pump: High-volume (like a Lincoln)
Ignition: MSD 7535 with boost retard
Flywheel: 12 lb aluminum
Clutch: 10″ – lightened counterweights
Application Notes: This is a race motor – it will never idle
well, has a big blower on it and it is designed for high-end horsepower.
The last time I ran it I was running 6800 through the traps (a bit
brave at the time!). I’m not yet sure what car/chassis I’m going to
put it back in . . . something to race and have run. Given ALL of the
above, I’m not worried about low-end torque — the blower helps this
anyway and it is designed with a single purpose in mind – racing and
high rpm power. This is why you’ll see much bigger ports (from what
you can see). I welded in exhaust dividers in the center ports and have
done lots of works on the guides to port match them (individually).
When I complete the valve work in the future – I’ll update these photos.
Here yah go – don’t have any real “in-progress” pictures . . .
Installment #4: Valve Guide Work
Once you’ve ported the heck out of a flathead block, you need to turn
your attention and your lathe to the valve guides. If you just run the
stock 49-53 guides, you’ll find that they stick up into your nice new
port – wrecking havoc on the flow. Back in the day, the quick and easy
trick was to grab a trusty hack-saw and cut the last 3/16 or so off of
the tops . . . a little less guide, no blending . . . crude and
partially effective.
What you really need to do is take a lathe and back-cut/reverse-radius
the tops of the intake and exhaust guides to match the port floors.
Typically the intakes will need more cut-back and radius, the exhausts a
little less.
The easiest way to understand how much to cut/blend is to use some
die-chem on the guide sides, place them in the port (with the horse shoe
clip) and scribe where the port floor intersects the guide side. Once
you know approximately how far to cut-back the intake and exhaust, you
should be able to use the same dimensions for the rest of them (with
the assumption that you were consistent in your porting work
1) Using a Lathe to Radius/Cut-Back the Guides:
Testing the Guide Fitment in the Port:
Custom Fitting Guides to Individual Ports: This example is on the 59L competition engine – where I wanted to blend the guide into the port shape as close as possible to the port floor. Every guide is individually fitted – and then it is indexed/pinned to keep the orientation. These are prototypes, will probably replace the bronze liner to stick up the full-length when I’m done.
PS: Glob-o-Matic: Barney Navarro and I talked about custom guides and intake port flow — he mentioned that he has seen guys weld a big glob of brass or even lead to the tops of the guides, then hand blend the port “turn” into this material. The goal was to help the air flow make the turn and not slam into the valve pocket wall! Cool Stuff . . . just wish I had more time to play and try this!
Installment #5: Things to know about valve springs . . . some myths busted in my mind!
Those of us who have built hot flatheads have probably heard about
‘Zephyr’ springs, Isky 185G single springs and maybe even the “hot
setup” for big cams . . . the Isky dual valve springs. How many of you
have ever actually tested them on a valve spring compressor or ran
them?
1) Engine Style and Spring Pressure: It if very easy to NOT
think about how simple the flathead valve train is — there are very few
moving parts . . . no rockers, no pushrods and not much weight
(unless you’re running those crap SOLID adjustable lifters). Due to
this, you really don’t need and don’t want much spring pressure on the
street – even for a .400 lift cam like the Isky 400 Jr., Potvin 3/8,
etc.. This is especially true if you’re being conservative on your RPM
range and not pushing the top-end past 5500 (which very few people
do). Also, the flathead only has 3 cam bearings, so putting a bunch of
spring pressure puts unnecessary pressure on the cam — and on a
high-lift cam (which has a small shank diameter or base circle), it
wants to deflect/flex all the more.
Putting your ‘Cam in the Oil Pan’: Lastly, the more spring
pressure you run on a flat tappet, mushroom or radius cam – the more
valve train wear you get. Want to wear that cast iron regrind out
really fast??? – put a bunch of spring pressure on it! Roller cams can
take much more, but they are made out of 8620 or 9310 billet steel and
are heat treated!
So how much is enough? Well . . . as usual, it kind of depends. For
MOST even hot street flatheads, you’ll probably not need more than 60 –
70 lbs on the seat. For even more radical cams (not really street
cams) – like the Potvin 425, you’ll probably not need more than 80 – 85
lbs (with the above rpm range). Even on my blown flathead with a very
radical .450 lift cam and steep fast opening ramps, I only ran 90 lbs
on the seat . . . ran to 6800 RPM and didn’t float a valve.
Flatdog with his Crower roller cam only ran about 90 – 100 on the seat .
. . with 10 lbs boost in a full drag-race application (.450 lift as
well).
2) Testing Installed Heights and Spring Pressure: You can buy a
nice hydraulic tester that will work on a drill press or a lathe for
somewhere around $80 (I think that is correct – checkout Jegs). It
works great:

3) Sample Spring Pressures and Flathead Myths: Here are some
numbers to review on spring type, pressure and installed heights. I
wanted to check it with a reasonable seat pressure and a “nose” pressure
– assuming a Potvin 3/8 cam – .375 or so lift (gross).
a) New Lincoln Zephyr Springs (new) – Reds:
Height: Pounds:
1.950 80
1.575 170
b) Isky 185G (new) – One of my favorite flathead single springs:
Height: Pounds:
1.980 80
1.605 180
c) Isky Dual Springs (new) – What many swear they need on cams like the 404-A, rollers, etc:
Height: Pounds:
1.765 80
1.390 180 lbs
d) Lincoln Zephyr (used) – came out of a 404-A radius cam setup
Height: Pounds:
1.820 80
1.445 150
Here is a picture – with the used Zephyrs on the left, then the new Zephyrs, then the 185G, then the Isky Duals:

So . . . did you notice anything funny in the numbers ?????????????????
How about those trick Isky dual springs? First of all did you notice how SHORT the installed height needed to be to just get 80 lbs? How the heck are you going to end up with a spring height of 1.765? – to do that, you’d need about .200 – .300 of spring shims (unless you ran shortened valves). This is especially true since many of you are using SBC valves in your flatheads . . . everybody is selling them and they are a bit longer than a flathead anyway. Even when you install the dual springs at the necessary height to achieve 80 lbs on the seat . . . they still have the SAME spring pressure as the single 185G springs on the nose. Also, they are a royal pain in the ass to install – as the outer spring will NOT fit through the guide bore . . . so you “assemble” them with the valve/guide in the block . . . now that REALLY sucks! Talk about one big cussing/swearing fest — and a lot of bloody knuckles . . . (even with the necessary tools).
If you have a fairly stout street engine – run the Zephyrs, if you have a really big cam and/or a blower, run the 185Gs. Use the approximate spring pressures listed above . . . or not, whatever makes you happy.
Author: Dale “Bored and Stroked” Hays, Vintage Horsepower, daleohays@gmail.com
